公司最近搞一个海外社交平台营销SAAS平台,涉及到用户自动化流程设计的编辑器。这个需求一直都蛮想挑战的。
大致设计稿如下
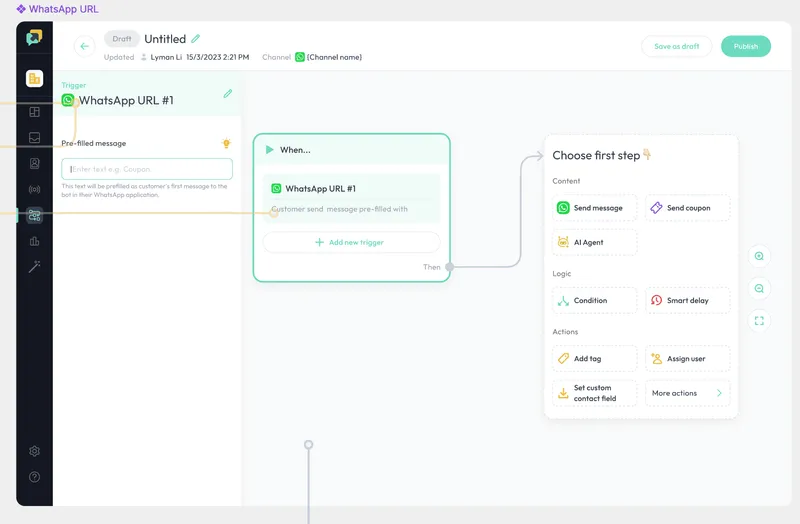
接需求后第一件事自然就是调研可用的框架,最终选定了阿里系的 AntV X6,在官网将他的示例中与需求所需的功能都多尝试与学习,感觉大概满足需求后,就开始上去就干‼️
复杂的任务,第一步当然是分解任务,将任务拆成一件件小的任务,分解的过程也是思考和确定执行方案的一个过程。
创建画布并使用Vue节点
把样式写完就是开始 面向 ctrl+c ctrl+v 开发,从各种示例中摘抄代码,再参照API文档调整属性
<template>
<div class="graph-node">
<div class="p-m2 flex justify-between items-center bg-brand/10">
<div class="text-tm flex items-center gap-m1">
<img class="w-[24px]" src="/automation/trigger.png" />
<span class="text-primary">When...</span>
</div>
</div>
<div>
<div class="p-m2">
<div class="flex flex-col gap-m2">
<div class="bg-brand/10 rounded-md p-m2">
<div class="flex items-center gap-m1">
<img class="w-[24px]" src="/automation/whatsapp.png" />
<span class="text-tm text-primary">Trigger title</span>
</div>
<div class="b-t-1 b-t-solid b-t-border my-m1"></div>
<div class="text-bm text-secondary">Trigger desc</div>
</div>
<button class="btn btn-outline w-full">Add new trigger</button>
<div class="text-bm text-secondary text-right">Then</div>
</div>
</div>
</div>
</div>
</template>
<template>
  <div class="relative overflow-hidden size-full" v-bind="$attrs">
    <div class="size-full">
      <div ref="GraphDOM" class="select-none"></div>
    </div>
    <TeleportContainer />
  </div>
</template>
<script setup lang="ts">
import "./graph";
import { Graph } from "@antv/x6";
import { register, getTeleport } from "@antv/x6-vue-shape";
import { onMounted, ref } from "vue";
import TriggerNode from "./components/TriggerNode.vue";

const TeleportContainer = getTeleport();

// 注册TriggerNode节点
register({
  shape: "TriggerNode",
  component: TriggerNode,
});

onMounted(() => {
  initGraph();
});

const GraphDOM = ref<HTMLDivElement>();
let graph = ref<Graph>();

function initGraph() {
  if (GraphDOM.value) {
    graph.value = new Graph({
      container: GraphDOM.value,
      autoResize: true,
      background: {
        color: "#f8fafb",
      },
      // 高亮器配置为className,但不设置args,取消默认的连线与拖动时节点高亮样式
      highlighting: {
        default: {
          name: "className",
        },
      },
    });
		// 创建 TriggerNode 节点
    const triggerNode = graph.value.addNode({
      id: "TriggerNode",
      shape: "TriggerNode",
      x: 300,
      y: 100,
    });
  }
}
</script>
<style lang="less">
@import "./graph.less";
</style>
.graph-node {
  --at-apply: "w-[362px] rounded-lg bg-white shadow-node overflow-hidden box-border";
  &:hover {
    --at-apply: "shadow-node ring-3 ring-brand";
  }
}
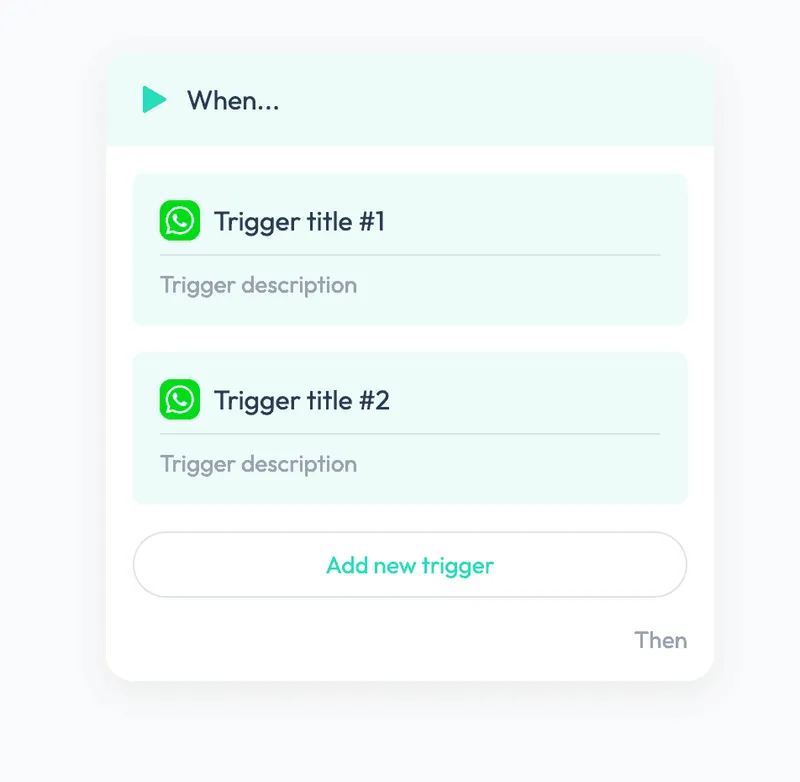
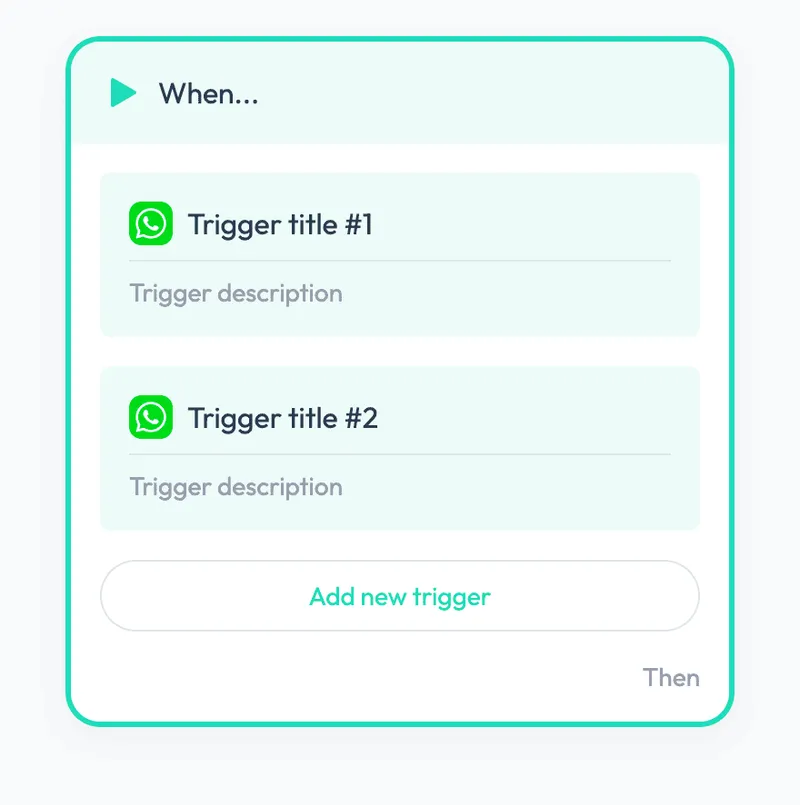
⚠️ 突然在safari浏览器发现的问题
在拖动节点的过程中,节点的渲染出现卡屏的现象
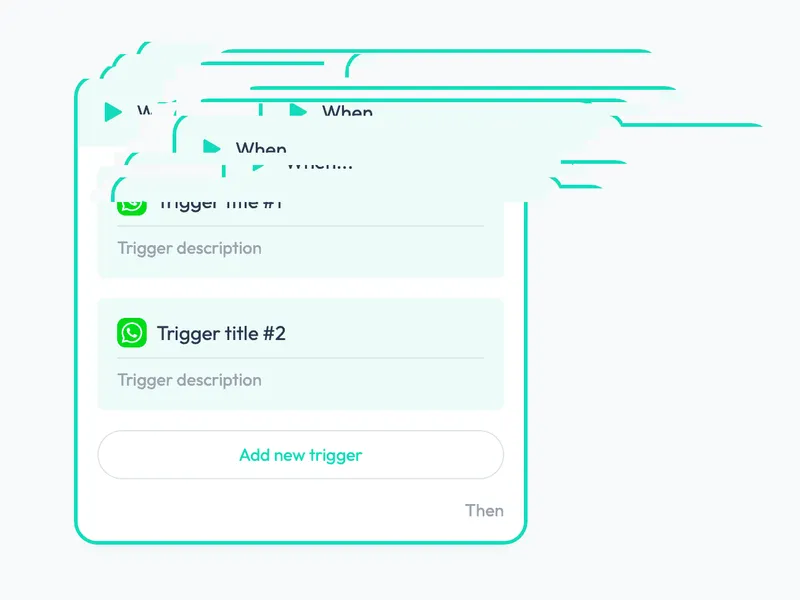
原因与方案
经过各种在找 github 中issue 列表和尝试中,发现主要原因是内容(包括阴影)超出svg的包裹。
svg的包裹元素不会自动根据容器内的DOM结构变化而撑开,所以我们就需要在节点尺寸发生改变时,设置容器的宽高(需加上阴影占用的宽高)
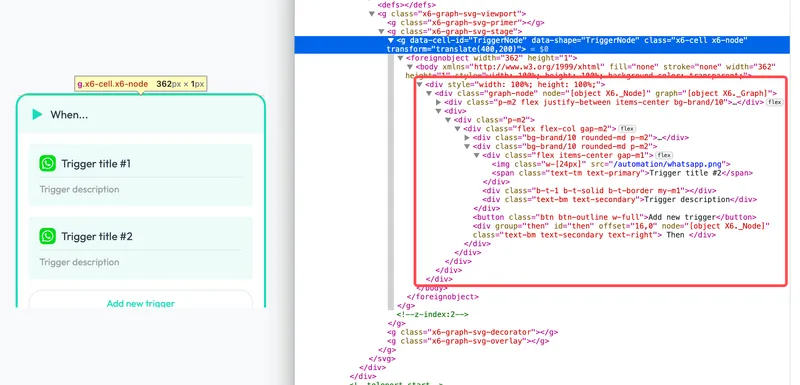
‼️定义一个节点的内间距,这个参数在后面许多的计算中都需要参与
export const GRAPH_NODE_PADDING = 20
.x6-node foreignObject body {
  padding: 20px;
}
未来所有新增的节点都需要考虑处理这个问题,所以我们就抽取出一个组件并复用
<template>
  <div ref="NodeRef" class="graph-node">
    <div :class="['p-m2 flex justify-between items-center', props.headerClass]">
      <slot name="header">
        <div class="text-tm flex items-center gap-m1">
          <img class="w-[24px]" :src="props.icon" />
          {{ title }}
        </div>
      </slot>
    </div>
    <div>
      <div class="p-m2">
        <slot v-bind:data="data"></slot>
      </div>
    </div>
  </div>
</template>
<script setup lang="ts">
import { Graph, Node } from "@antv/x6";
import { inject, nextTick, onMounted, ref } from "vue";
import { GRAPH_NODE_PADDING } from "../util";
const getGraph = inject<() => Graph>("getGraph");
const getNode = inject<() => Node>("getNode");

const graph = getGraph!();
const node = getNode!();

const NodeRef = ref<HTMLDivElement>();
const data = ref<Record<string, any>>({});

interface IProp {
  icon?: string;
  title?: string;
  headerClass?: string;
}
const props = withDefaults(defineProps<IProp>(), {
  icon: "",
  title: "",
  headerClass: "",
});

onMounted(() => {
  if (!NodeRef.value) return;
  // 创建ResizeObserver订阅观察尺寸发生变化时设置 node 容器尺寸
  const observer = new ResizeObserver((entries) => {
    for (const entry of entries) {
      rerender(entry.contentRect);
    }
    console.log("size change");
  });
  observer.observe(NodeRef.value);
  node.on("change:data", () => {
    data.value = node.getData();
  });
});

const rerender = (rect: DOMRectReadOnly) => {
  if (!NodeRef.value) return;
  const padding = GRAPH_NODE_PADDING * 2;
  const height = rect.height / graph.zoom();
  const width = rect.width / graph.zoom();
  node.size(width + padding, height + padding);
};
</script>
再改造 TriggerNode 使用该组件
<template>
  <NodeFrame header-class="bg-brand/10" icon="/automation/trigger.png" title="When...">
    <div class="flex flex-col gap-m2">
      <div class="bg-brand/10 rounded-md p-m2">
        <div class="flex items-center gap-m1">
          <img class="w-[24px]" src="/automation/whatsapp.png" />
          <span class="text-tm text-primary">Trigger title #1</span>
        </div>
        <div class="b-t-1 b-t-solid b-t-border my-m1"></div>
        <div class="text-bm text-secondary">Trigger description</div>
      </div>
      <div class="bg-brand/10 rounded-md p-m2">
        <div class="flex items-center gap-m1">
          <img class="w-[24px]" src="/automation/whatsapp.png" />
          <span class="text-tm text-primary">Trigger title #2</span>
        </div>
        <div class="b-t-1 b-t-solid b-t-border my-m1"></div>
        <div class="text-bm text-secondary">Trigger description</div>
      </div>
      <button class="btn btn-outline w-full">Add new trigger</button>
      <div class="text-bm text-secondary text-right">Then</div>
    </div>
  </NodeFrame>
</template>
<script setup lang="ts">
import NodeFrame from "./NodeFrame.vue";
</script>
节点的端口配置
节点与节点之间的连接,需求是通过连接桩交互进行连线,在这之前,我们先将节点与连线相关的配置统一整理在一起。
import { register } from "@antv/x6-vue-shape";
import TriggerNode from "./components/TriggerNode.vue";

// 需求中存在不同情况不同的端口颜色
export const portStyles = (color = "var(--edge-border)") => {
  return {
    circle: {
      class: "graph-port",
      color,
      style: `--port-color: ${color};`,
      magnet: true,
      r: 7,
    },
  };
};

register({
  shape: "TriggerNode",
  component: TriggerNode,
  ports: {
    groups: {
      then: {
        position: {
          name: "absolute",
        },
        attrs: portStyles(),
      },
    },
  },
});
端口位置X6提供蛮多种策略的,但我们的需求较为复杂,就统一使用绝对定位,并抽成组件通过根据 DOM 的位置计算并偏移定位。
<template>
  <div ref="portEl">
    <slot></slot>
  </div>
</template>

<script setup lang="ts">
import { onMounted, ref, nextTick, toRefs, inject, onUnmounted } from "vue";
import { Node, Graph } from "@antv/x6";
import { GRAPH_NODE_PADDING } from "../util";

type PostionType = "top" | "right" | "left" | "bottom" | "bottom-right";
type Offset = [number, number];
const getGraph = inject("getGraph") as () => Graph;

const graph = getGraph();

const props = withDefaults(
  defineProps<{
    node: Node;
    id: string;
    group: string; // 端口对应的组 groups
    position?: PostionType; // 对齐位置
    offset?: Offset; // 平面轴的偏移量
  }>(),
  {
    position: "right",
    offset: () => [0, 0],
  }
);

const { node } = props;
const { group, id } = toRefs(props);

const portEl = ref<HTMLDivElement>();

onMounted(() => {
  const nodeEl = document.querySelector(
    `[data-cell-id="${node.id}"] .graph-node`
  );
  if (nodeEl) {
    const observer = new ResizeObserver(() => {
      updatePostPosition();
    });
    observer.observe(nodeEl);
  }
});

onUnmounted(() => {
  removePort();
});

const removePort = () => {
  node.removePort(id.value);
};

/**
 * 更新连接桩位置
 */
const updatePostPosition = async () => {
  await nextTick();
  if (!portEl.value) return;
  const containerRect = portEl.value!.getBoundingClientRect();
  const zoom = graph.zoom();
  const wrap = document.querySelector(
    `[data-cell-id="${node.id}"] .graph-node`
  );
  if (!wrap) return;
  const wrapRect = wrap!.getBoundingClientRect();
  // 计算position位置
  const basicX = containerRect.left - wrapRect.left;
  const basicY = containerRect.top - wrapRect.top;
  const positionMap: Partial<Record<PostionType, Offset>> = {
    right: [basicX + containerRect.width, basicY + containerRect.height / 2],
    left: [basicX, basicY + containerRect.height / 2],
    top: [basicX + containerRect.width / 2, basicY],
    bottom: [basicX + containerRect.width / 2, basicY + containerRect.height],
  };
  const position = positionMap[props.position] || [0, 0];
  // 处理偏移量
  // 缩放时会影响到连接桩定位的计算,所以需要将缩放因素计算在内
  const offsetPosition = [
    position[0] + (props.offset[0] + GRAPH_NODE_PADDING) * zoom,
    position[1] + (props.offset[1] + GRAPH_NODE_PADDING) * zoom,
  ];
  const port = node.getPort(id.value);
  if (port) {
    node.setPortProp(id.value, "args", {
      x: offsetPosition[0] / zoom,
      y: offsetPosition[1] / zoom,
    });
  } else {
    node.addPort({
      id: id.value,
      group: group.value,
      args: {
        x: offsetPosition[0] / zoom,
        y: offsetPosition[1] / zoom,
      },
    });
  }
};
</script>
/* 为画板增加常用的连线颜色变量 */
.x6-graph {
  --edge-border: theme("colors.border");
  --edge-hover: theme("colors.brand");
  --edge-success: theme("colors.success");
  --edge-danger: theme("colors.danger");
}

/* 增加一下 port 的样式*/
.graph-port {
  fill: white;
  stroke-width: 3;
  stroke: var(--port-color);

  &:hover {
    opacity: 1;
    transform: scale(1.2);
  }
  &[connected="true"] {
    fill: var(--port-color);
  }
  &[hover="true"] {
    fill: var(--edge-hover) !important;
    stroke: var(--edge-hover) !important;
  }
}
<template>
  ...
-	  		  <div class="text-bm text-secondary text-right">Then</div>
				  <!-- 将 上一行 换成 下面这段,引用 NodePort 为节点创建端口 -->
+         <NodePort
+           v-if="node"
+           group="then"
+           id="then"
+           :offset="[16, 0]"
+           :node="node"
+           class="text-bm text-secondary text-right"
+         >
+           Then
+         </NodePort>
  ...
</template>
<script setup lang="ts">
import { inject } from "vue";
import { Node } from "@antv/x6";
import NodePort from "./NodePort.vue";

const getNode = inject<() => Node>("getNode");
const node = getNode!();
</script>
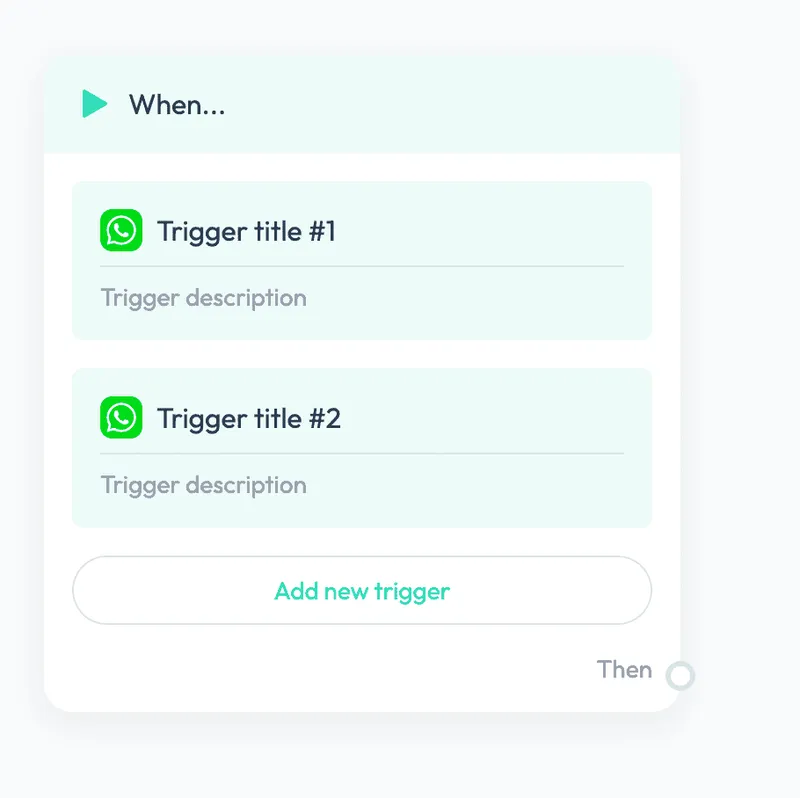
连线的样式与锚点
当你完成端口的设置后,再注册多一个Node后并添加后,节点之间就可以进行连线了,但连线的样式不符合需求,就需要为连线增加样式与锚点。
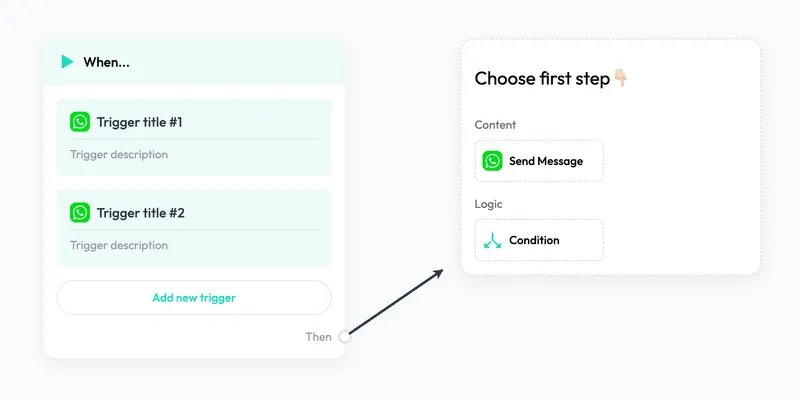
// 注册线连接端点连接时的锚点
Graph.registerAnchor("port-right", function (view, magnet) {
  const bbox = view.getBBoxOfElement(magnet);
  const result = bbox.getRightMiddle();
  return result;
});

// 注册线连接节点连接时的锚点
Graph.registerAnchor("node-left", function (view, magnet) {
  const bbox = view.getBBoxOfElement(magnet);
  const result = bbox.getTopLeft();
  result.x = bbox.x + GRAPH_NODE_PADDING;
  result.y = bbox.y + 25 + GRAPH_NODE_PADDING;
  return result;
});

// 注册箭头样式
Graph.registerMarker("arrow-storke", () => {
  return {
    tagName: "path",
    strokeWidth: 3,
    width: 14,
    height: 14,
    d: "M7 -7L0 0L7 7",
    strokeLinecap: "round",
    fill: "none",
  };
});

// 注册主题样式的连线样式
Graph.registerEdge("graph-edge", {
  inherit: "edge",
  attrs: {
    line: {
      class: "graph-edge",
      color: "var(--edge-border)",
      stroke: "var(--edge-border)",
      strokeWidth: 3,
      strokeLinecap: "round",
      targetMarker: "arrow-storke",
    },
  },
});
//...
		graph.value = new Graph({
      container: GraphDOM.value,
      autoResize: true,
      panning: true,
+     connecting: {
+       connector: "curveConnector",
+       allowBlank: false,
+       sourceAnchor: "port-right",
+       targetAnchor: "node-left",
+       connectionPoint: { name: "anchor" },
+       // 创建连线时配置连线样式
+       createEdge({ sourceMagnet }) {
+         let portColor = sourceMagnet.getAttribute("color");
+         const color = portColor || "var(--edge-border)";
+         const attrs = {
+           line: {
+             color, // 记录原色彩,方便hover高亮变色后回复原色
+             stroke: color,
+           },
+         };
+         return this.createEdge({
+           shape: "graph-edge",
+           attrs,
+         });
+       },
+     },
      highlighting: {
        default: {
          name: "className",
        },
      },
      background: {
        color: "#f8fafb",
      },
    });
//...
需求中连线并不像现在这种 smooth 的样式,这里就涉及到开发的高端操作:沟通更改一下设计需求,因为 AntV X6 提供的连线路由策略在蛮多情况下不太符合设计要求,且自定义路由策略需要更多的时间,我们当然是没必要在这种不太重要的地方浪费过多的时间啦。
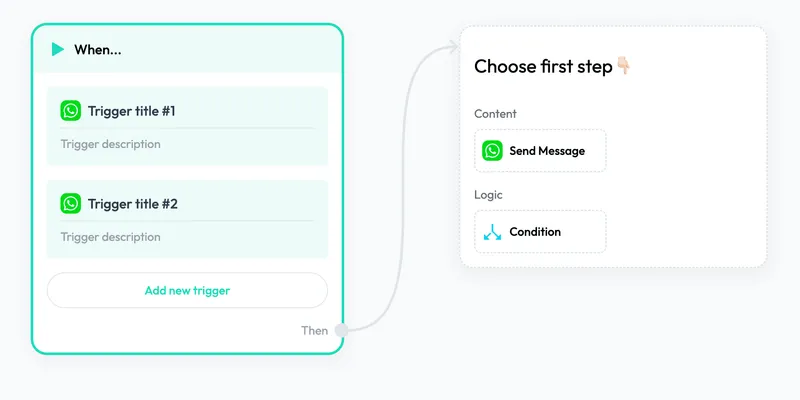
注册连线工具
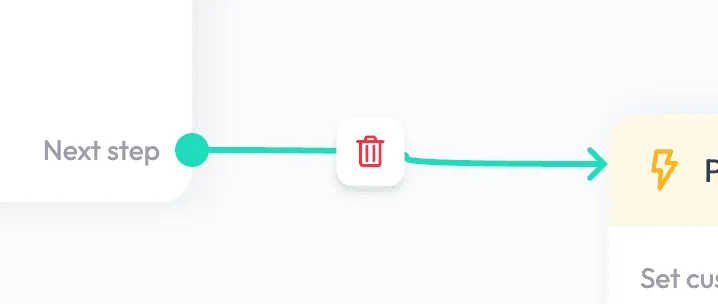
需求中鼠标进入连线区域,还需要显示删除按钮,用于删除连线
连线的按钮工具注册按钮后,对按钮的定位方式暂时只支持通过svg元素的transform属性偏移,使用div元素可能需要自己克隆后改写,所以就不搞那么复杂了,小小研究下svg的时间成本更低一些
Graph.registerEdgeTool("edge-remove", {
  inherit: "button",
  className: "edge-remove",
  markup: [
    {
      tagName: "g",
      attrs: {
        filter: "url(#drop_shadow)",
      },
      children: [
        {
          tagName: "rect",
          attrs: {
            x: -17,
            y: -17,
            width: 34,
            height: 34,
            rx: 8,
          },
        },
        {
          tagName: "path",
          attrs: {
            fill: "#F03D3D",
            stroke: "#F03D3D",
            strokeWidth: "0.1",
            strokeLinecap: "round",
            d: "m1.56,-6.79c0.18,0 0.33,0.16 0.33,0.34l0,0.73l-3.78,0l0,-0.73c0,-0.18 0.15,-0.34 0.33,-0.34l3.12,0zm-4.72,0.34l0,0.73l-3.26,0c-0.35,0 -0.63,0.28 -0.63,0.63c0,0.35 0.28,0.63 0.63,0.63l0.93,0l0,10.46c0,0.89 0.71,1.61 1.6,1.61l7.78,0c0.89,0 1.6,-0.72 1.6,-1.61l0,-10.46l0.93,0c0.35,0 0.63,-0.28 0.63,-0.63c0,-0.35 -0.28,-0.63 -0.63,-0.63l-3.26,0l0,-0.73c0,-0.88 -0.72,-1.6 -1.6,-1.6l-3.12,0c-0.88,0 -1.6,0.72 -1.6,1.6zm7.39,1.99l0,10.46c0,0.19 -0.15,0.34 -0.34,0.34l-7.78,0c-0.19,0 -0.34,-0.15 -0.34,-0.34l0,-10.46l8.46,0zm-3.11,1.7l0,7.37c0,0.35 0.28,0.63 0.63,0.63c0.35,0 0.63,-0.28 0.63,-0.63l0,-7.37c0,-0.35 -0.28,-0.63 -0.63,-0.63c-0.35,0 -0.63,0.28 -0.63,0.63zm-3.5,0l0,7.37c0,0.35 0.28,0.63 0.63,0.63c0.35,0 0.63,-0.28 0.63,-0.63l0,-7.37c0,-0.35 -0.28,-0.63 -0.63,-0.63c-0.35,0 -0.63,0.28 -0.63,0.63z",
          },
        },
      ],
    },
    {
      tagName: "filter",
      attrs: {
        id: "drop_shadow",
        width: 46,
        height: 46,
      },
      children: [
        {
          tagName: "feDropShadow",
          attrs: {
            stdDeviation: 6,
            dx: 0,
            dy: 3,
            floodColor: "rgba(0,0,0,.12)",
          },
        },
      ],
    },
  ],
  onClick({ view }: { view: EdgeView }) {
    view.cell.removeTools();
    view.cell.remove();
  },
});
+ .edge-remove {
+   --at-apply: "fill-white cursor-pointer";
+   &:hover {
+     --at-apply: "fill-brand-900";
+   }
+ }
注册工具后使用就在下面的交互章节一起说明吧
节点与连线交互与限制
节点交互
- 选中节点并平移画布将节点置入可视区域
- 操作、移除、连线节点时校验所有节点的状态
//#region 设置节点交互
const settingNodeEffect = () => {
  if (!graph.value) return;
  graph.value.on("node:click", ({ node }) => {
    if (currentNode.value?.id !== node.id) {
      checkGraphStatus();
    }
    setCurrentNode(node);
  });

  graph.value.on("cell:removed", ({ cell }) => {
    checkGraphStatus();
    if (cell.isNode() && currentNode.value?.id === cell.id) {
      setCurrentNode(undefined);
    }
  });

  graph.value.on("blank:click", () => {
    if (currentNode.value !== undefined) {
      setCurrentNode(undefined);
      checkGraphStatus();
    }
  });
};

// 设置聚焦节点
const setCurrentNode = (nodeOrId?: Node | string) => {
  if (!graph.value) return;
  // 先将所有节点的聚焦状态关闭
  graph.value.getNodes().forEach(async (node: Node) => {
    node.attr(".graph-node/focus", "false");
  });
  // 支持通过 ID 或直接 Node对象 设置
  let node: Cell;
  if (!nodeOrId) {
    currentNode.value = undefined;
    return;
  } else if (typeof nodeOrId === "string") {
    node = graph.value.getCellById(nodeOrId);
  } else {
    node = nodeOrId;
  }
  // 聚焦前确认节点是否有效与是否为节点
  if (!node?.isNode()) return;
  setTimeout(() => {
    currentNode.value = node;
    node.attr(".graph-node/focus", "true");
  }, 50);
  // 平移至当前节点的位置
  const translate = graph.value.translate();
  const zoom = graph.value.zoom();
  const bbox = node.getBBox();
  if (
    (bbox.x + translate.tx) * zoom < 360 ||
    (bbox.y + translate.ty) * zoom < 10
  ) {
    graph.value.positionPoint({ x: bbox.x, y: bbox.y }, 380, 100);
  }
};

const checkGraphStatus = () => {
  if (!graph.value) return;
  //缓存所有连线对应的端口数据
  const connectedPort = graph.value.getEdges().map((edge) => {
    const originColor = edge.getAttrByPath<string>("line/color");
    edge.attr("line/stroke", originColor);
    edge.removeTools();
    return `${edge.getSourceCellId()}-${edge.getSourcePortId()}${
      edge.getTargetNode() ? "" : "-shortcut"
    }`;
  });
  graph.value.getNodes().forEach(async (node: Node) => {
    // 此处可以增加检验节点是否正确并为节点设置 error 状态
    const ports = node.getPorts();
    ports.forEach((port) => {
      // 判断端口是否已连接
      const connected = connectedPort.indexOf(`${node.id}-${port.id}`) > -1;
      node.setPortProp(port.id!, {
        attrs: {
          circle: {
            connected,
            hover: false,
          },
        },
      });
    });
  });
};
//#endregion
连线与端口交互
- 节点每个端口只可以连接一个节点
- 连接后的端口需要更改一下样式
- 需求中连线需要在 hover 时变色
- 连接增加删除连线的按钮
//#region 设置连线交互效果
const settingEdgeEffect = () => {
  if (!graph.value) return;
  // 设置连线添加或连接事件,保证端口仅可连接一个节点
  graph.value.on("edge:added", onlyOutgoingEdge);
  graph.value.on("edge:connected", onlyOutgoingEdge);
  // 注册鼠标移入连线事件
  graph.value.on("edge:mouseenter", ({ edge, e }) => {
    if (e.handleObj.originType === "mouseup" || !edge.getTargetNode()) return;
    // 设置连线颜色
    edge.attr("line/stroke", "var(--edge-hover)");
    // 对应连线的端口也要设置hover状态
    edge.getSourceNode()?.setPortProp(edge.getSourcePortId()!, {
      attrs: { circle: { hover: true } },
    });
    // 连线增加删除按钮,引导节点连线不添加
    if (!edge.hasTools() && edge.getTargetNode()?.shape !== "GuideNode") {
      edge.addTools([
        {
          name: "edge-remove",
          args: {
            distance: edge.getPolyline().length() * -0.3,
          },
        },
      ]);
    }
  });
  // 设置鼠标移出连线事件
  graph.value.on("edge:mouseleave", ({ edge }) => {
    // 获取连接原颜色,并设置
    const originColor = edge.getAttrByPath<string>("line/color");
    edge.attr("line/stroke", originColor);
    // 对应连线的端口也要设置hover状态
    edge.getSourceNode()?.setPortProp(edge.getSourcePortId()!, {
      attrs: { circle: { hover: false } },
    });
    // 移除连线上的所有按钮
    edge.removeTools();
  });
};

// 限制节点每个端口只可以连接一个节点
const onlyOutgoingEdge = ({ edge }: { edge: Edge }) => {
  if (graph.value && edge.getSourceCellId() && edge.getTargetCellId()) {
    // 设置连线对应的source端口为连接状态
    edge.getSourceNode()?.setPortProp(edge.getSourcePortId()!, {
      attrs: { circle: { connected: true } },
    });
    // 获取此节点端口的所有的连线,仅保留一条连线
    let outgoingEdges = graph.value.getOutgoingEdges(edge.getSourceCellId());
    if (outgoingEdges) {
      outgoingEdges.forEach((outEdge) => {
        if (
          outEdge.getSourcePortId() === edge.getSourcePortId() &&
          outEdge.id !== edge.id
        ) {
          graph.value?.removeEdge(outEdge);
        }
      });
    }
  }
};
//#endregion
连线至空白出显示快捷菜单
需求中可添加节点的方式其中包括引导节点外,还有个在连线至空白处,弹出快捷创建节点的菜单
<template>
	<!-- ... -->
  <div
    :key="shortcut.pos?.x"
    v-show="shortcut.pos"
    :class="[
      'shortcut-menu shadow-node rounded-sm absolute b-[1.5px] b-dashed b-border bg-white',
    ]"
    @mousedown.stop
    :style="menuPosStyle"
  >
    <div class="p-m2 text-tl">Choose first step👇🏻</div>
    <div class="p-m2">
      <ChooseNextStep @select="handleChooseNode" />
    </div>
  </div>
</template>
<script setup lang="ts">
import ChooseNextStep from "./components/ChooseNextStep.vue";
//#region 显示快捷创建节点菜单
const nextMenuRef = ref<HTMLDivElement>();
const nextMenu = reactive<{
  pos?: { x: number; y: number };
  edge?: Edge;
}>({});

const menuPosStyle = computed(() => {
  return {
    left: `${nextMenu.pos?.x || 0}px`,
    top: `${(nextMenu.pos?.y || 0) - 25}px`,
  };
});

const settingNextMenu = () => {
  if (!graph.value) return;

  graph.value.on("edge:mouseup", ({ edge, e }) => {
    if (!edge.getTargetCell()) {
      hideNextMenu();
      if (nextMenuRef.value) {
        const bbox = nextMenuRef.value.getBoundingClientRect();
        let x = e.clientX;
        let y = e.clientY;
        x =
          bbox.width + x > window.innerWidth
            ? x - (bbox.width + x - window.innerWidth)
            : x;
        y =
          bbox.height + y > window.innerHeight
            ? y - (bbox.height + y - window.innerHeight)
            : y;
        nextMenu.pos = { x, y };
        const edgeProp = edge.getProp(),
          offsetX = x - e.clientX,
          offsetY = y - e.clientY;
        edgeProp.target.x += offsetX;
        edgeProp.target.y += offsetY;
        nextMenu.edge = graph.value?.addEdge(edgeProp);
      }
    }
  });

  window.addEventListener("mousedown", hideNextMenu);
};

const hideNextMenu = () => {
  nextMenu.pos = undefined;
  if (nextMenu.edge?.id) {
    graph.value?.removeCell(nextMenu.edge.id);
    nextMenu.edge = undefined;
  }
};

const handleChooseNode = (shape: string) => {
  nextMenu.pos = undefined;
  if (graph.value && nextMenu.edge && nextMenu.edge.isEdge()) {
    // 添加节点
    const newNode = graph.value.addNode({
      id: randomID(),
      shape,
      ...nextMenu.edge.getTargetPoint(),
    });
    // 将新建出来的连线设置target,完成连线
    nextMenu.edge.setTarget(newNode);
    nextMenu.edge
      .getSourceNode()
      ?.setPortProp(nextMenu.edge.getSourcePortId()!, {
        attrs: { circle: { connected: true } },
      });
    //手动触发仅支持一个
    onlyOutgoingEdge({ edge: nextMenu.edge });
    nextMenu.edge = undefined;
  }
};
//#endregion
</script>
应用交互
最后将这些交互设置在初始化Graph时配置一下,
//...
function initGraph() {

  if (GraphDOM.value) {
    graph.value = new Graph({
     // ...
    })

+ 	settingNodeEffect();
+ 	settingEdgeEffect();
+ 	settingNextMenu();
+   graph.value.addNode({
+     id: "TriggerNode",
+     shape: "TriggerNode",
+     x: 300,
+     y: 100,
+   });
}
// ...
‼️注意:数据的设置
export declare namespace Cell {
    interface SetDataOptions extends SetOptions {
        deep?: boolean;
        overwrite?: boolean;
    }
}
setData(data: any, options?: Cell.SetDataOptions): this
replaceData(data: any, options: Cell.SetOptions = {}): this
updateData(data: any, options: Cell.SetOptions = {}): this
removeData(options: Cell.SetOptions): this
其中 replaceData 和 updateData 是基于 setData 方法的二次封装,不做特别说明
replaceData(data) === setData(data, { ...options, overwrite: true })
updateData(data) === setData(data, { ...options, deep: false })
setData方法是通过浅比较来判断数据是否有更新,从而决定是否触发节点重绘。
关于数据的设置值得重点注意,有非常严重的深浅拷贝问题。
导致当设置的data中,删除某项不生效之类的,甚至先 cloneDeep 数据后再 setData 都一样不生效
解决方法:
最后在官方 issue 中也找到同遇到这个问题的xdm,其使用 removeData + setData 的方法解决,确实不失为一种绝佳方案
github 关联的 issue 2.x 的X6 node.setData()无法做到强制替换 · Issue #3262 · antvis/X6
node.removeData()
node.setData(data)
最后
X6 整体的应用还是很不错的,背靠大厂,使用也方便,文档只能说还行,不过还好在许多示例多,文档在介绍自己的功能上不够全面。项目运行测试1年多也基本没出现过什么问题。
写这篇文章真是太累了,刚开始想着就贴代码好了,但又感觉贴的太多影响阅读的体验,其次以前的代码总是常看常新,项目过程中没有问题尽可能不去乱重构与优化,也会耗费测试的资源,所以这次在总结并写成文章时,总是各种心痒的尝试新的方案去优化许多部分。

